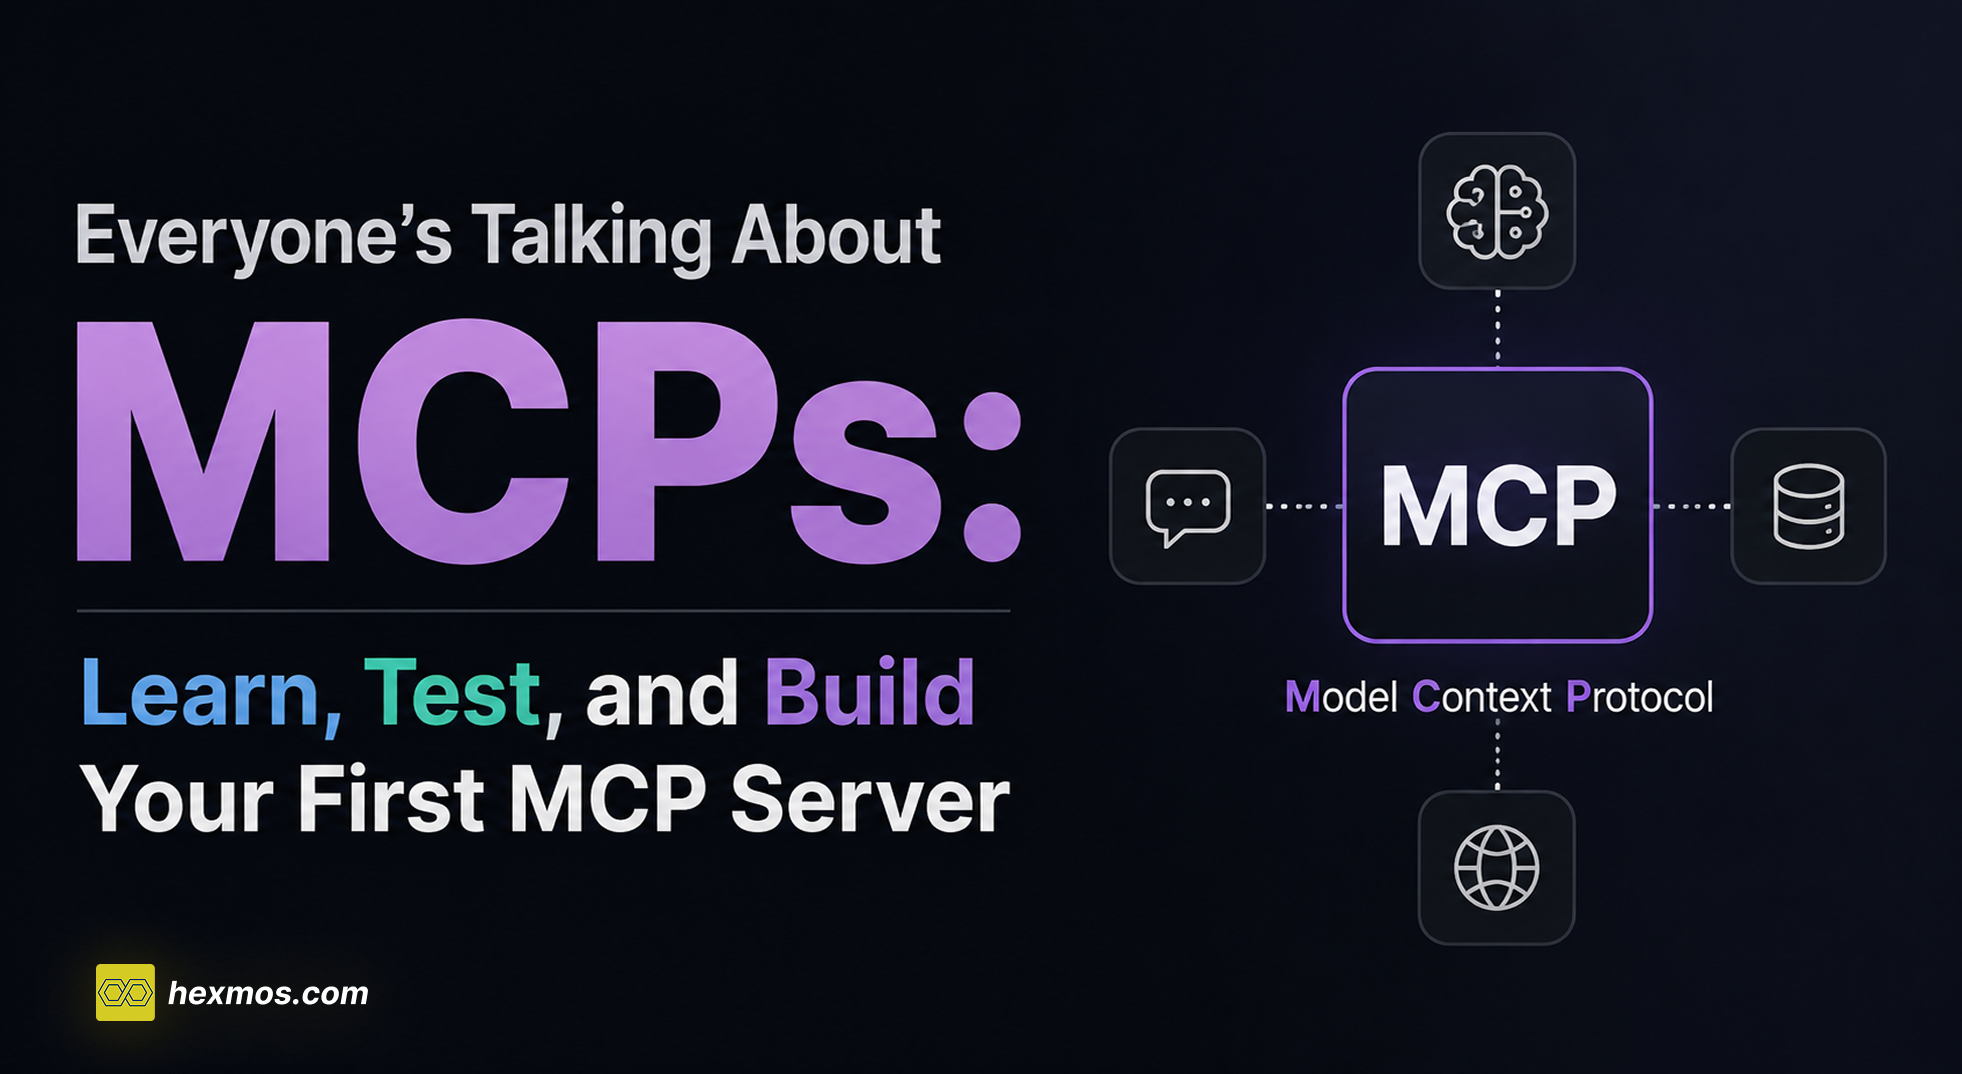
Everyone’s Talking About MCPs: Learn, Test, and Build Your First MCP Server
Learn what MCPs are, how AI tools interact with them, and how to build and test your own MCP server with a hands-on example.

Falling behind in the world of AI? Everyone seems to be talking about MCPs, but you have no idea what they actually are?
This article will guide you through understanding MCPs, how to use them, how to test them, and even how to build one on your own.
Understanding MCPs
MCP stands for Model Context Protocol.
At first, it might sound technical or intimidating, but the idea behind it is actually quite simple.
To understand MCPs properly, let’s break down each word one by one: Model, Context, and Protocol.
Model
Model refers to the AI model itself.
Some examples of AI models are:
- GPT model
- Claude
- Gemini etc
You can think of the model as the brain that generates responses.
But a model on its own has limitations.
For example:
- It does not automatically know about your files
- It cannot access APIs or external systems by itself
- Even with techniques like RAG, it can retrieve information, but it still cannot reliably perform actions or interact with systems in a structured way
- It cannot magically perform every specific use case without additional information
A model only knows what it has been trained on and what it is given during the conversation.
To overcome these limitations, we need to give the model access to outside information and tools.
This brings us to the next part: Context.
Context
Context is the information a model receives before generating a response.
You can think of context as everything the model knows at that moment.
For example, suppose you ask your AI assistant to retrieve information from your app’s backend.
For the model to do this, it needs context such as:
- What APIs or tools are available
- What actions can be performed
- What inputs those tools expect
- What kind of responses they return
Without this context, the model would be confused:
“What service? What API? What am I supposed to call?”
The more relevant context a model has, the more useful and intelligent its responses become.
In short, context helps the model understand what exists, what it can access, and what it is allowed to do.
Protocol
A protocol is simply a standard way for systems to communicate.
You have probably heard of protocols like:
- HTTPS → how browsers communicate with websites
- TCP/IP → how devices communicate over the internet
These protocols define a common set of rules so different systems can understand each other.
MCP works in a similar way.
When we put these concepts together:
Model + Context + Protocol
We get Model Context Protocol (MCP), a standardized way for AI models to communicate with external systems and tools.
Instead of every AI application inventing its own custom integration for files, APIs, databases, or developer tools, MCP provides a common language for connecting them in a structured and predictable way.
Using an MCP
MCPs have quickly been adopted by many AI tools and platforms. Companies are increasingly exposing their services through MCP so AI assistants can interact with files, APIs, databases, developer tools, and much more.
If you are interested in exploring existing MCP servers, check out the FreeDevTools MCP page
Instead of staying theoretical, let’s try out a real MCP server.
To use an MCP, you will need an AI coding assistant that supports MCPs.
Some popular options are:
- Codex
- Claude (Claude Desktop / Claude Code)
- Cursor
- Antigravity
For this demo, I’ll be using Codex.
Before adding an MCP, let’s ask Codex a simple question:
How do I make a modern button with the latest styles?
Here is the response without an MCP:

The answer is decent, but it is mostly based on the model’s existing knowledge and training data.
Now let’s add an MCP to improve the quality of the response.
For this demo, we will use Context7, an MCP that gives AI access to up-to-date documentation and framework knowledge.
Install it in Codex using:
npx ctx7 setup --codex
Once the installation is complete, ask the same question again.

Notice how the response is now more detailed, structured, and tailored.
This happens because the model now has access to more relevant and up-to-date context through the MCP, instead of relying only on what it already knows.
This is MCP in action.
Now that you have seen how MCPs can be used, let’s understand some basics of the MCP architecture. This will make things much easier as we continue building MCPs of our own.
Understanding the MCP architecture
Now that we have seen an MCP in action, let’s understand what is happening behind the scenes.
At a high level, MCP works through a few key components that communicate with each other.
Components of an MCP System
A typical MCP setup consists of three main parts:
- MCP Client
- MCP Server
- Underlying Systems (APIs, databases, filesystems, external services, etc.)
These components work together to let AI models interact with external systems in a structured way.
Along the way, we will also look at some important MCP concepts such as tools, resources, and the transport layer, since they play a key role in how these components communicate and work together.
Let’s understand them one by one.
MCP Client
The MCP Client is the component responsible for connecting the AI model with MCP servers.
You are already familiar with some applications that contain MCP clients:
- Claude
- Cursor
- Codex
- Antigravity
When you ask something like:
“Fetch the latest React documentation”
The MCP client is what coordinates everything behind the scenes.
Its responsibilities include:
- Sending your request to the LLM
- Discovering available MCP tools
- Talking to MCP servers
- Executing tools when needed
- Passing the results back to the model
In simple terms, the MCP client acts as an orchestrator.
It usually does not directly perform any logic of its own or call external systems itself. Instead, it coordinates communication between the model and the appropriate MCP server.
Concept of tools
At the core of MCP is the concept of tools.
A tool is simply a capability that an AI can use to perform some task.
Think of tools as functions that the AI is allowed to call.
For example:
-
A GitHub MCP might expose tools to:
- Fetch repository details
- Read issues
- Create pull requests
-
A Weather MCP might expose tools to:
- Get the current weather
- Fetch forecasts for a city
-
A Filesystem MCP might expose tools to:
- Read files
- List directories
- Search for files
Each tool usually defines:
- What the tool does
- What inputs it accepts
- What output it returns
For example, imagine a weather tool:
When you ask the LLM:
What is the weather in San Francisco?
The MCP client will:
- See that this requires external information
- Look at available MCP servers
- Find a weather MCP with a tool like
get_weather("San Francisco") - Call that tool
- Get the weather data
- Pass it to the LLM
- Get the final answer
MCP server
The MCP Server is the component that provides capabilities to the AI.
If the MCP client acts like an orchestrator, the MCP server is the thing that actually exposes useful functionality.
You can think of an MCP server as a tool provider.
Its responsibilities include:
- Exposing available tools to the client
- Executing tool requests
- Providing readable resources or context
Tool Discovery
Before an AI can use a tool, it first needs to know what tools exist.
This process is called tool discovery.
An MCP server advertises the capabilities it provides.
For example, a GitHub MCP server might expose tools like:
get_repositorylist_issuescreate_pull_request
When the MCP client connects to the server, it can discover these available tools and understand:
- What each tool does
- What inputs it accepts
- What kind of output it returns
Executing Tool Requests
Once the model decides a tool is needed, the MCP client sends a request to the MCP server.
The MCP server then performs the actual work.
For example:
“Get the latest issues from microsoft/vscode”
The flow would look something like this:
- MCP Client sends
list_issues("microsoft/vscode")to the MCP server - MCP Server calls the GitHub API
- Returns the issues data
- MCP Client passes this to the LLM
- LLM generates a summary
The server may internally call APIs, query databases, read files, or interact with other systems.
Resources
Besides tools, MCP servers can also expose resources.
Resources are pieces of readable information or context that the model can access.
For example:
- Documentation
- API specifications
- Configuration files
- Reference data
Unlike tools, resources are usually read-only.
Think of it this way:
- Tools → perform actions
- Resources → provide information
Transport Layer: STDIO vs SSE vs Streamable HTTP
Another common question is how do the MCP Client and MCP Server communicate with each other?
This is where the transport layer comes in.
A transport defines how messages travel between the MCP client and MCP server.
MCP supports multiple transport mechanisms depending on where the server is running and how it is deployed.
1. STDIO
STDIO is the simplest and most commonly used transport.
In this setup, the MCP client launches the MCP server as a local process.
Communication happens through:
stdin(standard input)stdout(standard output)
You can think of it like two programs talking to each other through pipes.
This is ideal for:
- Local developer tools
- Filesystem access
- Running MCPs directly on your machine
2. SSE (Server sent events)
SSE is useful when the MCP server runs remotely.
Instead of launching a local process, the client communicates with an MCP server over HTTP while receiving streamed responses from the server.
This is useful for:
- Cloud-hosted MCP servers
- Shared enterprise MCPs
- Remote APIs and services
3. Streamable HTTP
Streamable HTTP is the newer and more flexible transport mechanism.
Like SSE, it works over the network, but it provides a more modern request/response approach and better streaming support.
You can think of it as a more flexible way for MCP clients and servers to communicate over HTTP.
Building your own MCP server
Now that we understand how MCP works, let’s build our own MCP server.
For this example, I will be using FastAPI.
You can also check out the example repository here.
Before building an MCP server, we will first create a normal API.
In our case, we will build a small API that fetches GitHub user information and then expose it through MCP.
Step 1: Project Setup
Start by creating a new project:
mkdir github-mcp-demo
cd github-mcp-demo
python3 -m venv venv
source venv/bin/activate
Now install the required dependencies:
pip install fastapi uvicorn requests fastapi-mcp
Step 2: Create a Simple API
Now create a main.py file in the project root.
Add the following code:
from fastapi import FastAPI

import requests

app = FastAPI()


@app.get("/github/{username}")
def get_github_profile(username: str):
    response = requests.get(
        f"https://api.github.com/users/{username}"
    )

    if response.status_code != 200:
        return {"error": "User not found"}

    data = response.json()

    return {
        "username": data["login"],
        "followers": data["followers"],
        "public_repos": data["public_repos"],
        "profile_url": data["html_url"],
    }
What you see above is just a normal FastAPI endpoint.
We are creating an API first because later we will expose this functionality as an MCP tool.
Right now, this endpoint can only be called like a normal API.
Let’s change that.
Step 3: Convert the API into MCP Tools
Now let’s expose this endpoint as an MCP tool.
Update your main.py file like this:
from fastapi import FastAPI
from fastapi_mcp import FastApiMCP
import requests

app = FastAPI()


@app.get("/github/{username}")
def get_github_profile(username: str):
    response = requests.get(
        f"https://api.github.com/users/{username}"
    )

    if response.status_code != 200:
        return {"error": "User not found"}

    data = response.json()

    return {
        "username": data["login"],
        "followers": data["followers"],
        "public_repos": data["public_repos"],
        "profile_url": data["html_url"],
    }


mcp = FastApiMCP(
    app,
    name="GitHub MCP Server"
)

mcp.mount()
FastApiMCP automatically scans your FastAPI routes and converts them into MCP-compatible tools.
This means the model can now discover these endpoints and call them when needed.
Step 4: Start the MCP Server
Now let’s run the server:
uvicorn main:app --reload
Your MCP server should now be running locally.
Step 5: Inspect and Test the MCP Server
Before connecting it to an AI client like Claude, it is a good idea to test it first.
For this, we can use a tool called MCP Inspector.
Run:
npx @modelcontextprotocol/inspector
A browser window should automatically open.
You should see something like this:

Press the Connect button.
Since our server is running over HTTP, make sure:
- Connection Type →
SSE - URL →
http://localhost:8000/mcp
Once connected, you should see something like this:

Now press the List Tools button.

You should now see the tool we created for fetching GitHub user information.
This confirms that our FastAPI endpoint has successfully been exposed as an MCP tool.
MCP Inspector also allows us to test tools directly.

For example, I entered my GitHub username and executed the tool.
The MCP server successfully fetched my profile information:

At this point, our MCP server is fully functional.
Now let’s connect it to a real MCP client.
Step 6: Connect the MCP Server to Claude Desktop
For this demo, I will be using Claude Desktop, but the steps are similar for other assistants as well.
Initially, you will see something like this:

Open the menu from the top-left corner:

Then navigate to:
Settings → Developer → Edit Config
You should see something like this:

This will open a file named:
claude_desktop_config.json
Add the following configuration:
{
  "mcpServers": {
    "github-info-fetcher": {
      "command": "npx",
      "args": [
        "mcp-remote",
        "http://localhost:8000/mcp"
      ]
    }
  }
}
Here we are using mcp-remote because our MCP server is running over HTTP.
Instead of launching a local process through STDIO, Claude connects to the running MCP server remotely.
Now restart Claude Desktop.
You can try asking Claude about the MCP server to confirm it is connected.

Now let’s try using our tool.
I asked Claude to fetch my GitHub profile information:

Claude will ask for permission before executing the tool.
Press Allow.

And just like that, our MCP server is working.
Claude successfully discovered our tool, executed it, and returned the results.
Wrapping Up
We have covered the fundamentals of MCPs, explored how to use them, understood the architecture behind them, and even built a simple MCP server of our own.
The approach we used to create an MCP server is just one of many. As the ecosystem grows, different frameworks and patterns are emerging for building MCPs depending on the use case.
What makes MCPs particularly powerful is how they help bridge the gap between AI models and real systems.
Whether it is documentation, APIs, databases, developer tools, or internal company systems, MCP gives models a structured way to interact with them.
If you are working in a new environment or trying to learn an unfamiliar system, MCPs can be incredibly useful. Instead of spending hours figuring out documentation, APIs, or workflows on your own, an MCP-enabled AI can act like a subject matter expert that helps you understand things faster and become productive more quickly.
And this is only the beginning. MCP adoption is growing rapidly, and we are likely to see many more tools and workflows built around it.