How AI Systems Self-Correct with LangGraph?
Learn how LangGraph enables AI systems to self-correct and handle complex tasks autonomously.

Have you noticed how modern AI editors like Cursor or Antigravity handle tasks? When you ask for a code change, the AI writes the update, executes it in a terminal, reads any resulting error logs, and automatically rewrites the code to fix the bugs.
This process is known as an Agentic Loop. While traditional AI tools follow a straight line, LangGraph is the framework designed to build these systems that can loop back and fix their own errors.
What is LangGraph?
LangGraph is a library used to create stateful, cyclic AI workflows.

In a standard AI setup, a model receives an input and provide an output.
In LangGraph, the process is structured as a Graph. This allows developers to define specific steps (Nodes) and the paths between them (Edges).

Most importantly, it allows the system to repeat a step if a condition - such as a failed test or a factual error - is detected.
LangChain vs. LangGraph
How LangGraph is different from LangChain? LangChain is a framework designed to build "Chains" - predefined sequences of actions.
It uses LCEL (LangChain Expression Language) to link a prompt, an LLM, and an output parser together in a fixed order.
The main difference between the two lies in how they handle the flow of data:
-
LangChain: Data moves in one direction. It is a Directed Acyclic Graph (DAG), meaning it has a clear start and a clear end with no way to go backward. It is ideal for straightforward tasks, such as taking a long document and generating a summary. Once the summary is created, the process is finished.
-
LangGraph: Data can move in loops. It is a Cyclic Graph, which allows the system to revisit previous steps. If a result doesn't meet a specific requirement, the system can be programmed to return to an earlier node, update the information, and try again.


In a standard LangChain sequence, if the LLM makes a mistake in the middle of the chain, the system has no built-in way to "catch" that error and fix it before finishing. You simply get a wrong answer at the end.
In LangGraph, you can add a validation step. If the output is wrong, the graph sends the data back to the start. This allows for Self-Correction, which is essential for complex tasks like autonomous coding or multi-step research.
Core Use Cases of Langgraph
Agentic RAG (Self-Correcting Search)
Standard RAG finds documents once and generates an answer. If those documents are irrelevant, the AI hallucinates.
In Agentic RAG the system retrieves data and then "grades" it. If the grade is low, the system loops back, rewrites the search query, and tries again until it finds the correct information before generating the final answer.

Human-in-the-Loop
Many enterprise tasks require a human to verify an AI's action before it is finalized (e.g., sending a wire transfer or a client email).
The AI prepares a draft and then "interrupts" the process. The state is saved, and the system waits for a human to click "Approve" or "Edit" in a UI. Once the human interacts, the graph resumes or loops back to incorporate the feedback.

Automated Coding Tools
This is the logic used by tools like Cursor to fix bugs autonomously.
A "Coder" node writes a script. An "Executor" node runs it.
If a crash occurs, the "Error Logs" are sent back to the Coder. The Coder reads the logs, fixes the line of code, and sends it back to the Executor.
The Self-Correcting Fact Bot
To see this in action, we can build a simple "Fact Bot" using python and LangGraph for the logic. We have a grader node that will check the response of the researcher node and if it is not correct, it will ask the researcher node to try again.
Installation and Setup
We install langgraph to manage the logic and langchain-openai to connect to OpenAI's models.
uv init langgraph-demo
cd langgraph-demo
uv add langgraph langchain-openai
In this code we are defining four components of langgraph: State, Nodes, Edges, and Compilation.
The State
The State is the shared memory of the graph. It is defined using a Python TypedDict.
class AgentState(TypedDict):
    response: str
    is_valid: bool
    count: int
The state tracks the AI's current answer (response), whether the grader approved it (is_valid), and how many times the system has tried to answer (count).
When a node returns a value, it updates this shared dictionary.
The Nodes (researcher and grader)
Nodes are the individual functions that perform work.
workflow.add_node("researcher", researcher)
workflow.add_node("grader", grader)
Each node represents a specific step in the process. In LangGraph, a node takes the current State as an input and returns an update to that State.
-
The Researcher Node: This function generates the answer. Note that it checks the count in the state to decide whether to give a wrong answer or a correct one.
-
The Grader Node: This function acts as a validator. It reads the response from the state and returns a boolean value for is_valid.
The Edges and Entry Point
Edges define the direction of the data flow. They determine which node the system should move to next.
Entry Point:
workflow.set_entry_point("researcher")
Normal Edge:
workflow.add_edge("researcher", "grader")
Conditional Edge:
This is the component that allows the system to be cyclic rather than linear.
workflow.add_conditional_edges(
    "grader",
    lambda state: "end" if state["is_valid"] else "retry",
    {"retry": "researcher", "end": END}
)
A conditional edge uses logic to choose between multiple paths.
After the grader node finishes, the system looks at state["is_valid"].
-
If True, it follows the path to END, and the process stops.
-
If False, it follows the path to researcher. This creates the loop that allows the AI to try again.
Compilation
The Compile step turns the description of your nodes and edges into a runnable application.
app = workflow.compile()
Before you compile, the graph is just a set of instructions. Compiling validates the graph structure and creates the app object that you can actually execute or stream data through.
Running the Execution
To run the graph, we pass an initial State to the app.stream() method. Using stream allows us to see the updates from each node as they happen.
if __name__ == "__main__":
    # Define the starting state
    initial_input = {"task": "What is the capital of France?", "count": 0, "is_valid": False}

    # Execute the graph
    print("--- STARTING GRAPH ---")
    for output in app.stream(initial_input):
        for key, value in output.items():
            print(f"Node '{key}': {value}")
When you run the command uv run python main.py, the terminal will display the following sequence.
This "trace" shows the system identifying its own mistake and looping back to fix it.
--- RESEARCHER (Attempt 1) ---
{'researcher': {'response': 'The capital of France is Lyon.', 'count': 1}}
---
--- GRADER CHECKING ---
{'grader': {'is_valid': False, 'feedback': 'Wrong capital. Try again.'}}
---
--- RESEARCHER (Attempt 2) ---
{'researcher': {'response': 'The capital of France is Paris.', 'count': 2}}
---
--- GRADER CHECKING ---
{'grader': {'is_valid': True, 'feedback': 'Correct!'}}
---
Here is the full code:
from typing import TypedDict, List

class AgentState(TypedDict):
    task: str
    response: str
    feedback: str
    is_valid: bool
    count: int


def research_node(state: AgentState):
    print(f"--- RESEARCHER (Attempt {state['count'] + 1}) ---")

    # We'll simulate a mistake on the first try.
    if state['count'] == 0:
        return {"response": "The capital of France is Lyon.", "count": state['count'] + 1}
    else:
        return {"response": "The capital of France is Paris.", "count": state['count'] + 1}

def grader_node(state: AgentState):
    print("--- GRADER CHECKING ---")
    if "Paris" in state['response']:
        return {"is_valid": True, "feedback": "Correct!"}
    return {"is_valid": False, "feedback": "Wrong capital. Try again."}


from langgraph.graph import StateGraph, END

# 1. Initialize the Graph
workflow = StateGraph(AgentState)

# 2. Add the Nodes
workflow.add_node("researcher", research_node)
workflow.add_node("grader", grader_node)

# 3. Connect the Edges
workflow.set_entry_point("researcher")
workflow.add_edge("researcher", "grader")

# 4. The Decision Point (Conditional Edge)
def decide_to_finish(state: AgentState):
    if state["is_valid"]:
        return "end"
    return "retry"

workflow.add_conditional_edges(
    "grader",
    decide_to_finish,
    {
        "retry": "researcher",
        "end": END
    }
)

# 5. Compile the Graph
app = workflow.compile()


# At the bottom of main.py
if __name__ == "__main__":
    inputs = {"task": "What is the capital of France?", "count": 0, "is_valid": False}
    for output in app.stream(inputs):
        print(output)
        print("---")
Launching the Visualizer
To visualize this graph, we can use LangSmith, a platform for debugging and tracing AI applications. It allows you to see the flow of data and the state of the variables at each step.
uv run langgraph dev
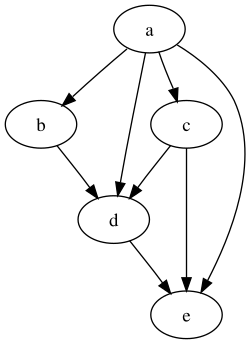
This command starts a local server and provides a URL (usually http://localhost:2024). When you open this in your browser, you are taken to the LangGraph Studio interface.
Once the Studio opens, it automatically parses your main.py and draws the graph. You will see the nodes and edges.

Conclusion
Building AI as a Graph instead of a Chain changes how we handle errors. By using LangGraph, your application doesn't just fail when it hits a mistake; it analyzes the error and retries.